Diane Crossfit Wod – A Beastly Strategy to Improve your PR
updated January 1, 2019
Among the stable of CrossFit ‘Girl’ workouts of the day, Diane Crossfit Wod is a short, sharp, and intense challenge. This Diane Crossfit Wod has been challenging both male and female Crossfitters since 2003. Diane Crossfit Wod involves just two moves for time and can be done in a matter of minutes. In this article, we find out how you can give your very best to Diane.
Quick NavigationWhat Does Diane Involve? What Goal Time Should I Be Aiming For? Optimizing Exercise PerformanceThe Deadlift The Handstand Push Up Extra Tips for Doing the DianeScaling the ‘Diane’ WorkoutScaling the Handstand Push Up Summary
What Does Diane Crossfit Wod Involve?
Diane Crossfit Wod is a timed workout. It consists of the following:
- Deadlifts
- Handstand push-ups
You perform 3 rounds of 21-15-9 reps in as fast a time as you possibly can.
What Goal Time Should I Be Aiming For?
- Beginner: Between 7 and 10 minutes
- Intermediate: Between 4 and 7 minutes
- Advanced: Between 2:30 and 4 minutes
- Elite: Less than 2:30
Optimizing Exercise Performance
Diane Crossfit Wod is designed to be a fast-paced, fluid workout that is performed in a non-stop fashion. To be able to achieve that, you need to be able to execute each of the exercises as correctly and as efficiently as possible. The following exercise hacks will allow you to do just that.
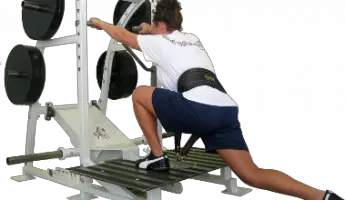
The Deadlift

If you are a guy, you will be using a weight of 225 pounds for the deadlift. Women will use a weight of 155 pounds.
This exercise involves lifting the bar off the ground and bringing it to the front of the thighs or hips with the body standing tall and the arms straight. The muscles that are primarily recruited during a deadlift are the quadriceps and the buttocks, and the lumbar muscles. The bar is held with straight arms; therefore, the forearms, shoulders, and trapezius muscles are also involved. The hamstrings support the pelvis, and the gastrocnemius and soleus stabilize the calves.
When performing a deadlift, keeping the back in the correct position throughout the exercise is crucial, including when setting the bar down. Poor form can cause spinal injuries. Any rounding of the back means you should let go of the bar or stop the workout.
Technique Tips
In the starting position, your feet should be hip-width apart, and your hips should be in the same plane as your knees (higher or lower depending on body dimensions). Your torso should be as straight as possible from the beginning to the end of the movement to reduce stress on the lower back. The feet are in line with the femurs. The back is straight and leaning forward, but it should never be rounded. The synergistic muscle action of the quadriceps, back muscles, buttocks, and hamstrings is the essential point.
#1. Weight Placement: The feet should be perfectly flat on the floor, and the body weight should be distributed evenly over the entire foot. When possible, wear shoes with thin, stiff soles.
#2. Stance (Traditional Deadlift): Feet are hip-width apart.
#3. Stance (Sumo Deadlift): Feet are wider than hip or shoulder width apart.
#4. Hand Placement and Grip: Use a pronated or mixed group, with the hands shoulder-width apart.
#5. Back Position: Control the forward tilt of the pelvis and hold straight throughout the exercise.
#6. Starting Position: The shoulders are pulled back, the chest is sticking out, and the hips are in almost the same plane as the knees, and the pelvis tilted forward with control.

#7. Head Position: The gaze should be fixed on a point directly in front of you.
#8. The Deadlift: Put the arms under tension and stand up with your back straight. The bar brushes along the legs until you are upright and balanced.
#9. Prepare for the Descent: Follow the reverse path but do not release control of your back.
#10. Critical Moments: The first is below the knees, and the other is just after the knees. In both cases, you risk losing control of the back. For that reason, your form has to be better than ever.
#11. Breathing: Breathe in a while in the starting position as you place tension on your muscles. Stand up without breathing and then exhale after you reach the full position.
The Handstand Push Up
- Starting on your hands and knees, place your feet against the wall and walk your way up into a handstand position so that your toes end up against the wall, your body is relatively vertical and in a straight line, and you are facing the wall.
- Lower the body slowly by bending the elbows until the head reaches the ground.
- Reverse the movement and raise the body back to the starting position. When the set finishes, walk your way down the wall back to your hands and knees.

The wall handstand push-up is the most challenging overhead pressing movement because it requires you to lift your entire body weight. This exercise is much more challenging than a typical push up for two reasons. First, people are stronger in horizontal pressing options in comparison to vertical pressing motions. Second, the handstand push up involves hoisting the entire body weight, whereas the standard push up involves only about 70 percent because of the four points of contact with the floor and the angle of the torso.
There are several ways to perform this movement – feet against a wall behind the body, feet against a wall in front of the body, a partner holding the legs, or freestanding. Obviously, the freestanding version is the most difficult because of balance requirements.
For people who are not yet able to perform reps of handstand push-ups, here is a progression that you can follow to build up to being able to do so.
Wall Walk to Hold
Start in the pushup position with your feet against the wall. Walk your feet up the wall and then walk your hands back until you are in the top position of a handstand pushup. Hold this position for 15 seconds. While doing so, practice active shoulders, where you lift your shoulders toward your ear and maintain a tight shrug.
“Feet Up” Dumbbell Press
Sitting on a flat bench, perform dumbbell shoulder presses with your feet a few inches above the floor. It will be tough to maintain your balance, so be sure to keep your abs tight.
Pike Push Up
With your hands on the floor, place your feet on a bench and lift your hips (into a pike position), putting as much of your weight as possible over your hands. Bend your arms to lower yourself until your head touches the floor, then press back up.
Full Handstand Push Up
Kick up on the wall, so your heels are touching, lower yourself until your head touches the ground, and press back up.
Extra Tips for Doing the Diane Workout
- Keep your core tight through the entire movement and reps
- Position your hands a little away from the wall, so that you are better able to kick up into position
- Keep your thumbs pointed toward the wall
- Do not overextend at the top of the movement
Scaling the Diane Workout
When you approach a workout such as Diane Crossfit Wod, you need to check your ego at the door. It the stipulated loads or reps are beyond your ability, you will end up using a terrible form with the probable result that you’ll get injured. That is why you should work up to this Diane Crossfit Wod by scaling.

The first thing you should scale is the load on the deadlift. If the stipulated weight is too high (225 pounds for men, 155 pounds for women), then start with a load that is more reasonable for you. You can find that weight by taking your one rep max and multiplying it by 70 percent. So, if your one rep max is 200 pounds, then you should use 140 pounds for your Diane deadlifts. 70% of your one rep max will still be a challenge for you, especially when you are shooting for 21 reps, but the challenge is what Diane Crossfit Wod’s are all about.
Scaling the Handstand Push Up
A lot of people cannot do handstand push-ups. Here is a progression of scales for still doing a modified version of Diane.
- Incline Push Ups
- Standard Push Ups
- Ring Push Ups
- Decline Push Ups
- Handstand Push Ups
You can also scale Diane Crossfit Wod by giving yourself a ten-minute time cap. If you find that hitting 21 reps on your first round is just too taxing, scale it back to 15-12-9 for the first few times you take on the workout. Then ramp it up to 18-15-12 for three challenges, before stepping up to the full challenge of 21-15-9.
Summary
Because Diane Crossfit Wod is a timed workout, your goal is to maintain a steady, unbroken pace on the workout. It will be most challenging in the first round. If you need to break this round up to maintain proper form, aim to hit 13 reps before you take your break. Then push through your final 9 reps before powering on to the next round, knowing that your reps have just been significantly lowered. Good luck!
Other WOD Strats
| WOD |
WOD Name |
Description |
|---|---|---|
 |
WOD Strats- MURPH |
|
 |
WOD Strats – Helen |
|
 |
WOD Strats – The Seven |
|
 |
Wod Starts – JACKIE WOD |
|
 |
Wod Strats – Kalsu | On the minute (until you complete 100 reps of thrusters).
|
 |
WOD Strats – Cindy |
|
 |
WOD Strats – Angie |
|
 |
WOD Strats – Diane
|
|